There’s no doubt, the web is highly visual. Social feeds and blogs are leveraging captivating imagery to improve and augment the audience experience. And chances are, you spend a fair amount of time searching for just the right images to accompany your social and blog posts. But there are a lot of factors that go into finding and using the right photo for your posts.
Here are a few agency-insider tips we live by when it comes to using images for blogging and social media...
1. Know where to look.
Knowing where to find great images is half the battle. And, if you're tempted to head straight to Google to find images, use caution! Not all images you find on Google are available to use on your blog and social media. And for that matter, not all images you find on Flickr are free to use either. Many of these images are copyright protected, and using them could get you into legal trouble.
With that said, here are a few photo resources that are free to use without attribution (a.k.a. public domain images):
- Pixabay offers high-quality images free for use. Pixabay has robust search functionality, and they source all of their images through an online community of talented photographers. They also offer a smaller collection of free vector graphics and illustrations.
- Public Domain Archive is home to a great collection of free use images. The volume and search function isn’t quite as strong as Pixabay, but all-in-all, it’s a good resource to keep in your back pocket.
- Death to the Stock Photo is another resource to keep on your list. Though, they operate more on a “freemium” model. You can subscribe to their service and receive a monthly pack of free, high-quality images. Going premium at $20/month gives you access to their full library.
Also, you can safely search for images that are free to use on Google and Flickr. Just brush up on your Creative Commons use licensure first, so you’ll know exactly which images are fair game and which you need to avoid using.
You’ll need to use the proper search criteria entered into Google Advanced Image Search and Flickr Advanced Search in order to gain access to those usable images. Here’s a complete how-to blog post on searching for free images on Google and Flickr – the right way.
2.Give credit where credit is due.
If you’re not using a public domain image (and the image isn’t yours), then you’ll need to give the photographer credit. And in most cases, “giving the photographer credit” means more than simply listing his or her name.
In fact, Creative Commons has an entire 1600 word document outlining best practices for attribution. The resource offers a wide range of scenarios and examples for proper attribution. The resource is deeply informative, but it's just way too long for everyday use. (I do, however, recommend at least one detailed reading.)
The secret to efficiently and properly including attribution is to use a formula. Here’s the attribution formula we usually use:
[Site Source], licensed under [License + License Link]
A good practice is to save your attribution formula somewhere for quick and easy use like your blogging template or editorial calendar.
3. Use the Right Image Dimensions
When it comes to using images for social media, there are several different image dimensions per social media channel. And if images aren't optimally sized before uploading, social media networks will automatically crop your image to their standards when it’s served in a news feed. That level of creative decision-making is not something you want to leave to a bot. Letting Facebook or other social networks automatically crop your images can result in cutting off valuable information or damaging the balance in composition.
Your best bet is to keep a social media image sizing guide handy. These types of image guides make it easy and straightforward to know the optimal dimensions for images across social networks.
Where your blog is concerned, it’s a great idea to create a blogging image template for your primary photo. The width of your template should be the full width of the content area for your blog posts. In terms of height, there’s a lot of flexibility. Just be sure to test your image across desktop and mobile. Then strike the right balance between the two presentations of your image. Also keep in mind how your blog post image will appear when your post is shared across social.
By using a blogging image template that’s tailored to your blog, you’ll be able to swiftly optimize the image size. All you’ll need to do is drop your image into the image template using a photo editor of your choice, and you’re assured that each of your images will be a consistent size.
4.Don’t Upload a Huge File
When it comes to quality imagery, a high-resolution 10 meg image is… well, it’s pure eye candy. But, while this eye candy is pretty sweet to look at, it’s no friend to your website.
Large images will reduce your site load time. And if your page takes too long to load, people will abandon your site. In fact, according to Kissmetrics, 40% will abandon a website that takes more than 3 seconds to load!
One of the first things you can do to reduce the file size is assure the image dimensions are no larger than you absolutely need them to be. For instance, if you need a large header image that’s 900px wide, don’t upload an image that’s 1200px wide. Also, check to make sure your image is saved at 72 dpi.
If you have Adobe PhotoShop, you can take advantage of their “Save for Web” command. Using this command will give you even more control over reducing file size while still maintaining quality. The “Save for Web” function is particularly useful when you have a single webpage with several images.
5. Make Sure Google Can “See” Your Image (aka optimize your image for SEO)
Google and other search engines crawl the web for text. So when it comes to imagery, they can’t “see” your images (at least not yet). Because Google can't see your images, you need to take a few extra steps to provide search engines with information about your images. This is accomplished with the image “alt” attribute and through your image file name.
When you’re looking at the source code, this is what the alt attribute looks like:
Most blogging platforms make it easy to add alt text to images without having to directly edit the HTML. For example, in WordPress, the edit image option provides an easy-to-use “alternative text” field (see below image).
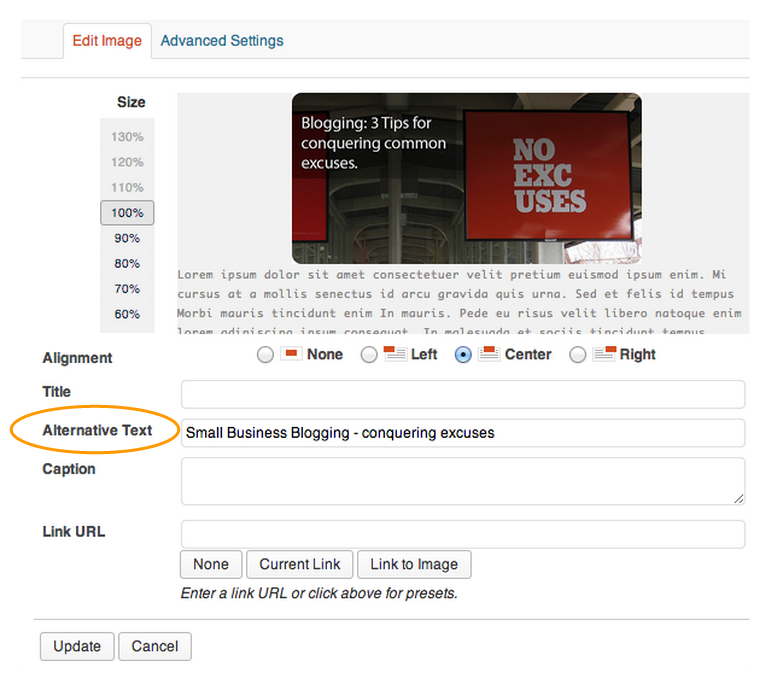
Also, before you upload an image to your blog, be sure to rename the file. Give it a meaningful name – not just the default name from your camera or stockimage006698. Why? Because search engines don’t just crawl the text on your website, they also search for keywords in your image file names!
BONUS: Stock your toolbox
Lastly, you need to have the right tools to get the job done. PhotoShop is my first recommendation. However, if you don’t have PhotoShop, here are a few other editing tools to choose from:
- PicMonkey is an extremely easy-to-use photo editor. The online tool offers a wide range of editing capabilities with a user-friendly interface.
- Canva is a great tool to use for images with text overlay. The platform has pre-built templates that are optimized for social, and they have a wide range of ready-to-use creative styles.
- Pixlr offers a lot of robust functionality for a free, web-based tool. This is a great tool for users who are more hands-on and aren’t looking for ready-made styles and templates (say, for example, that PicMonkey and Canva offer).
- GIMP is for the power user who doesn’t have access to PhotoShop. It’ a free, open source photo editing application that can <almost> do anything PhotoShop can do. Though, GIMP can be clunky compared to the polished functionality of PhotoShop.
Conclusion
Do you have any tried-and-true photo tips? Share your favorite photo tools or tips below.
Share this

What Makes Video So Effective?
Is My Camera Good Enough to Use for Video?

/Accreditations/CRM-Implementation-Accredited-Badges.png?width=170&height=138&name=CRM-Implementation-Accredited-Badges.png)
/Accreditations/Onboarding-Accredited-Badges.png?width=170&height=137&name=Onboarding-Accredited-Badges.png)
/Accreditations/Custom-Integration-Accredited-Badges.png?width=170&height=137&name=Custom-Integration-Accredited-Badges.png)